Warping Boards vs Warping Pegs: Choosing the Best Tool for Your Loom

Warping sits at the quiet beginning of every weaving project. Before the shuttle starts moving and before fabric begins to grow, there is this slower, more deliberate stage of measuring, counting, and organising threads.
For beginners, it is often the first part of weaving that feels technical and a little intimidating. For experienced weavers, it is where accuracy and efficiency really matter. The tools you use at this stage shape not only how smoothly the process runs, but how your finished cloth behaves on the loom.
In this article, we look at two common warping tools: warping boards and warping pegs. We’ll explore how each one works, where each is most useful, and any limitations, so you can choose a setup that suits your space, loom, projects, and your preferred way of working.
Why Warping Tools Matter
Before comparing different tools, it is helpful to understand why warping is such a crucial stage in weaving.
The warp forms the structural foundation of your cloth. It determines the finished length of your project, the number of ends on the loom, and how evenly the fabric develops as you weave. When a warp is measured and wound inconsistently, problems often appear later in the process, including uneven tension, difficulty advancing the warp, and running out of yarn before the project is complete.
Warping tools support this stage by providing consistency and control. They allow you to measure lengths accurately, manage multiple threads more efficiently, and reduce tangling before the warp is transferred to the loom. While careful technique is still essential, the right tools make warping more reliable and easier to repeat from project to project.
Warping Boards: Precision and Efficiency
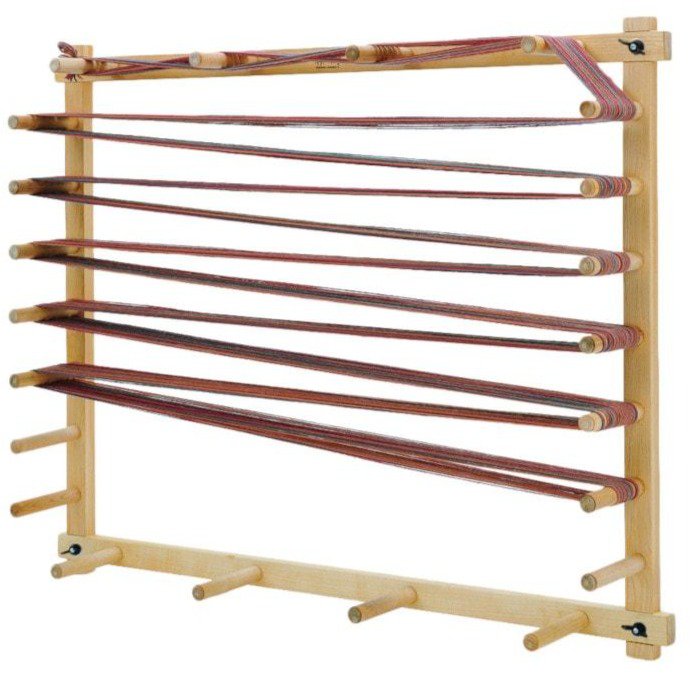
Warping boards have pegs arranged in a fixed pattern. The yarn is wound around these pegs in a specific path, allowing you to measure consistent warp lengths and keep track of multiple threads as you work.
How Warping Boards Work
When using a warping board, you begin by securing the yarn to a starting peg. The yarn is then wound around the pegs in sequence, following the board’s layout. Each complete circuit represents a fixed length, determined by the spacing between the pegs. As you wind, count the ends until you reach the number required for your project.
During this process, a cross is formed, usually at one end of the warp and sometimes at both. This cross keeps the threads in order, makes counting easier, and is essential for smooth threading later. It also helps prevent tangling when the warp is removed from the board and transferred to the loom.
Once the warp is complete, it is secured with ties and carefully chained as it is removed from the board. The board's fixed structure keeps threads aligned throughout the process, which is especially helpful when working with fine yarns or large numbers of ends.
Because of this structure, warping boards are particularly well-suited to:
- Large projects and high numbers of ends.
- Complex or repeated warps where consistency matters.
- Keeping threads organised for easy transfer to the loom.
Cons of Warping Boards
- Requires dedicated space, though wall mounting can reduce the footprint.
- Less portable than individual pegs.
- There is a steeper learning curve.
Warping Boards Available at Thread Collective
Thread Collective stocks a small, carefully chosen range of warping boards to suit different spaces, projects, and ways of working. Each has its own character and strengths, depending on how and where you weave.
- Leclerc Warping Boards
- Solid, dependable boards that feel reassuringly stable in use.
- Assemble and pack down easily for weavers who need some flexibility.
- These can be used flat or mounted on a wall, adapting well to studios of various sizes
- Evenly spaced pegs support calm, accurate measuring.
- Available in three sizes:
- Small (up to 5.9 m) and medium (up to 12.8 m) for rigid heddle and table looms.
- Large (up to 19.2 m) for longer floor loom warps.
- Schacht Warping Boards
- Thoughtfully designed for both home studios and shared spaces.
- Available in two sizes: up to 4 m and up to 12.8 m.
- Mounts easily on walls or doors, making good use of vertical space.
- A smaller board works well for seated warping and compact rooms.
- Ashford Warping Boards
- Beautifully made frames that combine practicality with natural materials.
- Support steady, consistent warping for relaxed, focused work.
- Available in two sizes:
- Up to 4.5 m for small looms and hybrid warping.
- Up to 11 m for longer projects.
Warping Pegs: Simplicity and Flexibility
Warping pegs offer a more open, adaptable approach to measuring warp yarn. Rather than working with a fixed frame, individual pegs are placed into a surface such as a tabletop, pegboard, wall, or simple wooden frame. The yarn is then wound between these points to create the desired warp length.
This method appeals to many weavers because it can be shaped around the space you have, rather than requiring you to adapt your workspace to a large piece of equipment.
How Warping Pegs Work
When warping using pegs, two or more pegs are positioned at measured distances to define your warp length. The yarn is wrapped back and forth between them to build the required number of ends.
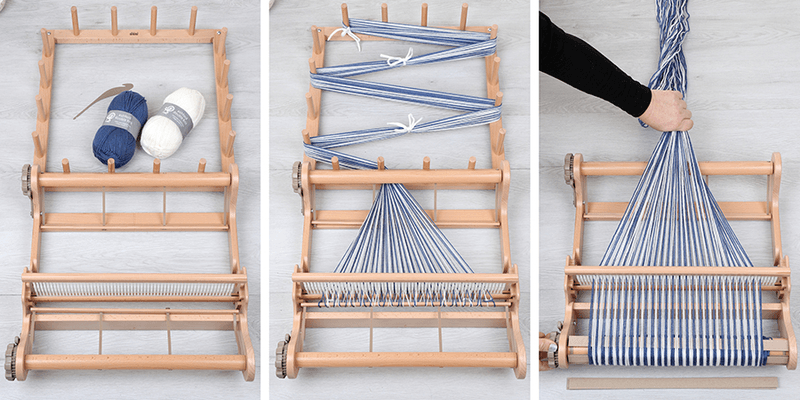
Rigid heddle looms can often be warped directly using a single peg placed at a suitable distance from the loom, depending on the project length. This allows the warp to be wound and threaded in one continuous process.
For table and floor looms, a multi-peg setup is usually more practical. Using at least three pegs, or a dedicated peg set with a built-in cross maker, helps maintain thread order. Forming a clear, consistent cross is essential when warping off the loom, as it keeps threads organised during beaming and threading.
Careful placement, steady tension, and, where needed, additional guide pegs all contribute to a smooth and manageable warp.
Pros of Warping Pegs
- Simple and accessible, with a low equipment cost.
- Easy to store and transport.
- Suitable for direct warping on rigid heddle looms.
- They can be adapted to almost any available space.
- Well-suited to beginners and small projects.
Cons of Warping Pegs
- Measurement accuracy depends on careful setup.
- Threads can become tangled when working with many ends.
- Requires attention to tension and a stable working surface.
- More care is needed to maintain a clean, consistent cross.
Warping Peg Tools from Thread Collective
For weavers who enjoy the flexibility of peg-based warping, Thread Collective offers a small range of thoughtfully designed tools that support both direct and indirect methods.
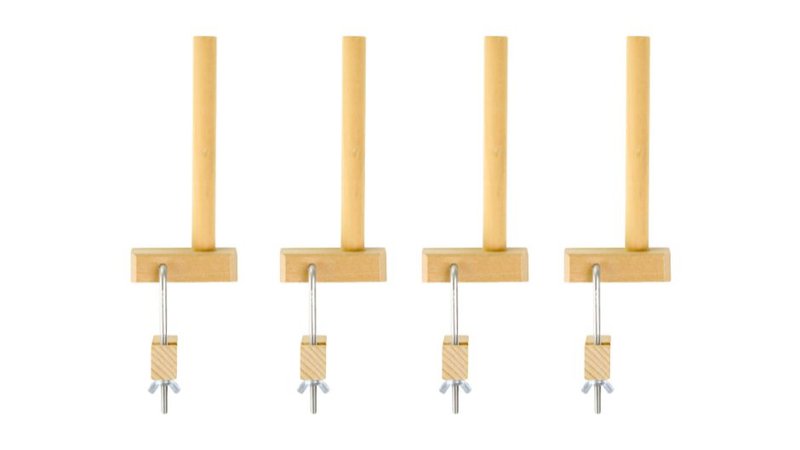
The Ashford Warping Peg with Clamp is designed primarily for direct warping on rigid heddle looms. A single peg can be clamped securely at a measured distance from the loom, allowing you to wind and thread the warp in one continuous process. Made from durable ash wood with a natural finish, it offers a simple, reliable way to measure and prepare shorter warps without needing a full board or frame.
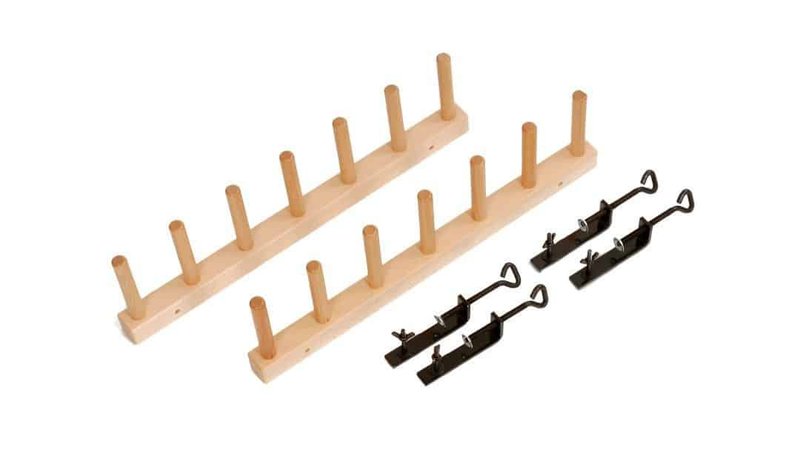
The Schacht Warping Peg Set provides a practical alternative to a traditional warping board for weavers working off the loom. It includes a starting peg, a cross peg, and clamps to secure them in place. To wind a warp chain, the starting peg and cross peg are secured with the included clamps, creating a clear, stable path for the yarn. The built-in cross maker helps maintain thread order, which is especially important when transferring the warp to a table or floor loom. Easy to store and quick to set up, this system suits weavers who want structure and reliability without a permanent installation.
Comparing Warping Boards vs Warping Pegs
Both warping boards and warping pegs can be reliable, practical tools. The difference lies in how they fit into your space, your projects, and the way you prefer to work. The table below outlines their main strengths and limitations to help you decide which approach is likely to suit you best.
| Feature | Warping Boards | Warping Pegs |
|---|---|---|
| Measurement accuracy | High | Moderate |
| Ease of use | Moderate | High |
| Suitable for many ends | Very suitable | Less suitable |
| Portability | Moderate to low | High |
| Space required | Dedicated or table-top | Minimal |
| Beginner friendly | Moderate | Very suitable |
| Best for large projects | Yes | Less suitable |
Choose a Warping Board if:
- You weave regularly and value consistency from one project to the next.
- You wish to indirectly or hybrid warp a rigid heddle loom.
- You are using a table or floor loom.
- You often work on larger pieces or more complex structures.
- Accurate measuring and efficient setup are important to you.
- You have a dedicated space where a board can remain set up.
Choose Warping Pegs if:
- You are using a rigid heddle loom.
- You are new to weaving and prefer a simple, low-barrier setup.
- You work in a small or shared space and need something portable.
- You mostly weave samples, scarves, or smaller projects.
- You enjoy having a flexible system that can adapt to different situations.
Special Mention: Warping Posts
The Louet warping posts can be positioned and spaced to suit your workspace and project length, allowing you to create a setup that fits both your loom and your available space. This flexibility makes them particularly useful for weavers who do not have room for a permanent warping board but still want the stability of a fixed system.
These can be used for both hybrid and indirect warping methods, making them a versatile option for weavers who like to adapt their setup to different projects and working styles. Constructed from unlacquered beech, the posts also offer a natural timber surface that suits a wide range of studio environments and can be maintained or finished according to personal preference.
Practical Tips for Successful Warping
Whichever tool you choose, a few steady habits can make warping feel calmer, more reliable, and more enjoyable over time.
- Carefully calculate your warp length, allowing for loom waste and take-up.
- Use ties, markers, or counting threads to help keep track of your ends.
- Aim for even, consistent tension as you wind.
- Label your warp with fibre type, length, and project details for future reference.
With experience, these small practices feel natural. Warping becomes less about avoiding mistakes and more about settling into a steady, confident rhythm.
Choosing the Right Tool for Your Weaving Practice
There is no single best warping tool for every weaver. The best choice for you depends on how often you weave, the scale of your projects, the space you have available, and the way you like to work.
Warping boards from Leclerc and Schacht tend to suit weavers who work regularly and on larger or more complex projects, where consistency and efficiency become especially valuable. Warping pegs, peg sets, and frames from Ashford often suit beginners, smaller spaces, and weavers who prefer flexible setups that can change from project to project.
Warping posts add another option for those working with long warps or in more permanent studio spaces, offering stability alongside adaptability.
In the end, the best tool is the one that fits comfortably into your working rhythm and supports the kind of weaving you most enjoy.
Weaving with Thread Collective
At Thread Collective, the focus is on supporting weavers at every stage of their practice, from learning new skills to refining long-established techniques. Whether you are choosing your first warping tool or adjusting your setup for more complex projects, having the right information and equipment makes the process more enjoyable and sustainable.
For more weaving guides, practical tips, and thoughtful reflections on making, explore the Thread Collective blog and continue building confidence at the loom.
Share this article on your favorite platform:
Table of Contents
- Why Warping Tools Matter
- Warping Boards: Precision and Efficiency
- How Warping Boards Work
- Cons of Warping Boards
- Warping Boards Available at Thread Collective
- How Warping Pegs Work
- Pros of Warping Pegs
- Cons of Warping Pegs
- Warping Peg Tools from Thread Collective
